So there I am, sittin' at my computer, drinkin' coffee, when I hear a commotion in the garage. Uh oh. This could only mean one thing.
"Good morning." My dad walked through the door! "I came over to kick your butt into gear!"
Literally, those were the words! Having only woken up in the previous hour and still nursing my coffee, I'm not sharing the same drive that he is!
He again asks what needs done, and I don't remember if it was him or me that suggested it, but I think it was him, but we decided to tackle the non-existent shelf below the kitchen sink.
Ugh. That is a big project!
Ok, so as the story goes, sometime in the last 26 years, this house had a leak underneath the kitchen sink. It could have been the sink itself, it could have been the dishwasher drain, it could have even been the exterior door upstairs that is directly above this location. But somehow or another, water landed on the particle board shelf and caused it to pull away from the staples that barely held it together. At that point, the shelf itself pulled away from its grooves and curled into such a stiff arch that nothing could bend it back without breaking it into pieces.
So a few weeks ago, that's exactly what I did. I tore the shelf out and put it in the trash. And that's how my sink cabinet has been ever since...filthy and without a shelf. It didn't bother me a bit. Again, it's one of those "I'll get to it eventually" projects. Riiiiiiiiiiight.
So here's what was required:
1. Clean up the black mold on the back wall. Yes, more black mold.
2. Clean up the filthy dirt and dust off the original linoleum. The original linoleum is staying in since that's what the rest of the cabinets rest on top of.
3. Clean out the air vent. Yes, for reasons unknown to man, an air register is located underneath the sink, underneath the original shelf. It comes up out of the floor and makes a 90-degree turn where it comes out the cabinet kickplate and fires hot or cold air on your feet as you do the dishes. It's...unique.
4. Re-attach the air register which is leaking cold winter air from the crawlspace into the house. Yet ANOTHER air leak! I keep finding them!
5. Construct some sort of device that will have the air make that 90-degree turn. I had purchased a tin air register, but it was too big for the small area.
6. Create a support structure for the new shelf going in.
7. Install the new shelf.
8. Cut and install linoleum on the new shelf.
Easy enough, right?! ha!
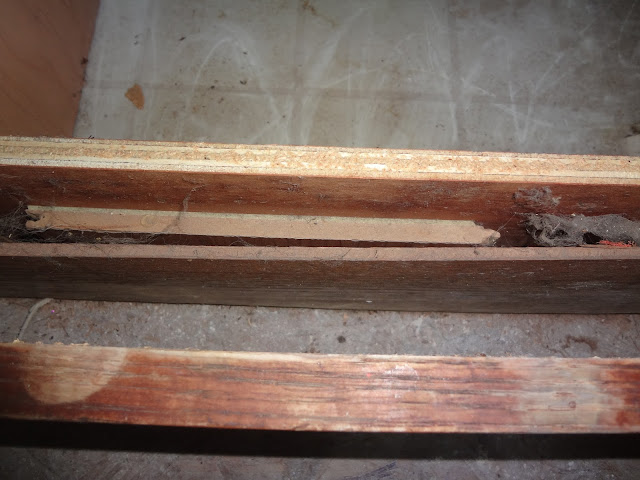
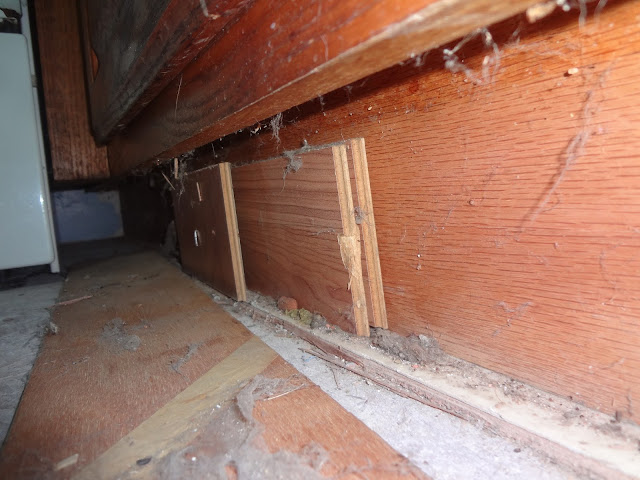
So as we always do, we just started going at it. I cleaned up the black mold with bleach. I cleaned up the filthy linoleum. And while down in there cleaning, that's when I noticed the first surprise of the day (Dad and I ALWAYS find surprises). For whatever reason (I have a theory below), the previous owner or contractor had installed flooring behind the kickplate of the cabinet! Yes, flooring! He had cut the laminate wood and placed these pieces vertically behind the oak panel kickplate. Because these were not evenly spaced throughout, the kickplate had a little bit of a wavy pattern to it. Frankly, it just wasn't straight! So when I have tile in here, the tiles will not be straight with the cabinets! (Of course you cut them, but you should be able to cut them evenly!).
 |
| Can someone say dirty? |
 |
| This house is so gross. |
 |
| Dust, mold, dog hair, who knows what else. |
 |
| The cleaning project before the project could even begin! |
 |
| I have no idea what this black stuff is, but mold obviously appeared to love it. It took a good amount of scraping and cleaning spray to get this off. SO GROSS! |
So here's my theory: Rather than use quarter-round, I think he just butted out the kickplate wall to cover up his edges at the end of his boards. I really do. It was a very cheap and unprofessional way of doing it. But why else would he do this?! At one point, he had three pieces stacked on top of each other! Unbelievable. I removed them all.
 |
| The first surprise. The kickplate bowed out because the previous owner put flooring (yes, flooring!) behind the panel! I think it was used to cover up his short cuts [did you see what I did just there?]! |
 |
| So that gap from the panel to the cabinet front bottom was significant! |
 |
| At one point, he used THREE pieces of flooring to bow the cover out! Talk about cutting flooring short! Also as a side note...dog food, anyone? GROSS! |
And I vacuumed up the dog underneath the kickplate and cabinet and inside the vent. Seriously, more hair. SO MUCH HAIR. It's so gross! This house is just disgusting! Hair, dust, spider shell, you name it. That's one of the reasons I hadn't started on this project yet...there is so much to do pre-project!
 |
| So much dog hair. So much dirt. So much disgusting. |
 |
| I don't think my mom could have done this! She would have gagged! |
 |
| Dog hair everywhere. |
 |
| Just think: Every breath I breathe in this house gets to come through here first! |
 |
| All cleaned up! |
 |
| I can breathe clean air again! |
 |
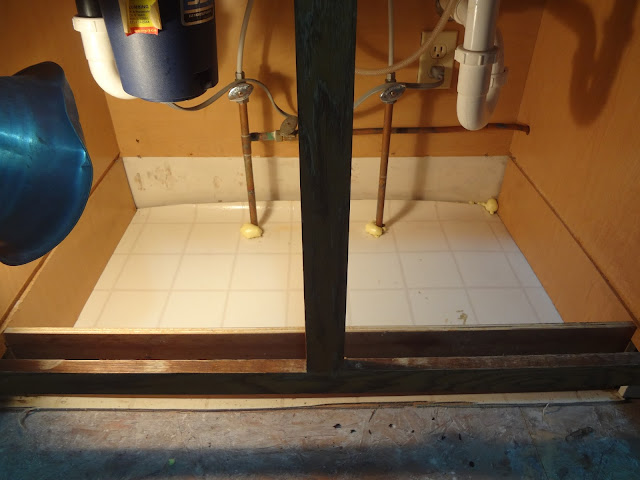
| Ready for a shelf! |
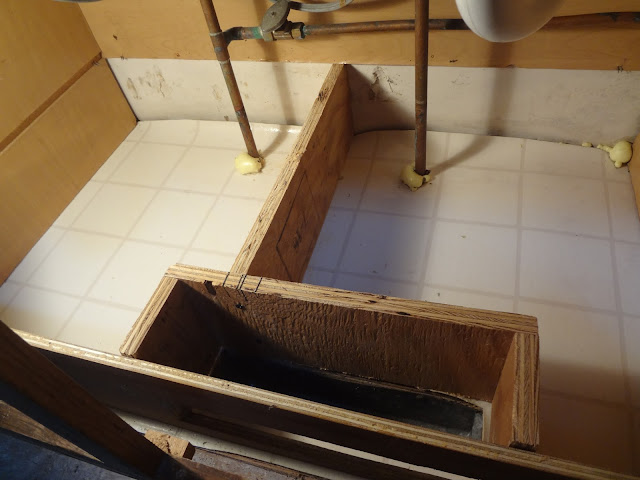
But once all of that was cleaned up, it was time to build. We had a loose plan, and it made sense to both of us, so we started building ourselves a support structure for underneath the shelf. Like we always do, we found some wood in my garage that would work. That's why we keep it around, ladies! For times like this! We decided to build a cavity above the air vent that would let air in and then disperse it out the side register in the cabinet front. Behind that, we would build a middle piece to place two sections of shelving on top of (one big piece would not fit through the front openings). And that would be it!
Easy, right?
So we built our support structure, and we had our first snafu of the day (Dad and I ALWAYS have snafus!). I installed the pieces incorrectly against each other! It was a minor mistake, but we both missed it! ha! Oh dear. Who lets us work together?! So I took it apart and installed it correctly.
 |
| This would be the support for our shelf. |
 |
| Our new cavity over the air vent to direct it out the front. The new shelf will be the top. |
We also had another snafu with my table saw. For whatever reason, we basically used the fence on the opposite side that we should have. Long story short, we created a great deal of work with pieces of wood flying everywhere (the safety shield wouldn't come down since we had the fence so close to the blade...I mean
right next to it!). We wouldn't catch our oversight until later when cutting another piece. I mean, seriously, how are we allowed to work with power tools?! Sometimes I wonder.
It's nothing short of comical. We have to laugh because otherwise we get too frightened.
 |
| I had all the saws out today! |
The support structure went in as expected, and so it was time to build a shelf! I went to Lowe's and bought a new piece of wood. The previous shelf slid into the side of the shelf (a groove went along the entire depth), and so we were going to use that portion again.
We made the cuts, notched out the section for the water pipes with my $1-garage-sale-find-jigsaw, and tested it out. Nearly a perfect fit! I had to trim up a small sliver along the edge to get it. But it then fit perfect!
 |
| The first half in! Fits great! |
 |
| Halfway done! |
We cut the other side and tested it out. Again, a little bit of trim work around the pipe, and it set into place perfectly! We were impressed even with ourselves! The pieces fit GREAT! We attached them to our support structure and had a completed shelf! Nice, Pa!
 |
| The second piece in! |
 |
| I have a brand-new shelf! |
We cut out a piece of linoleum to fit, and it looks great! The cabinets are now ready to go! Later that evening, I made a trip back to Menard's for something else and found exactly what I was looking for to wrap up this project. I needed new pipe flanges to cover up my holes in the linoleum. But I needed to cut metal ones to get them to slide around the already-existing pipe. Well, a friendly plumbing salesperson let me on to exactly what I needed: a plastic piece that you click apart, flex around, the pipe, and let come back together! It has a chrome finish and looks sharp! I'll remember these for future projects! Love it!
 |
| The clean shelf ready for storage! |
 |
| I found these chrome plastic flanges that literally spread apart to go around the pipe! EXACTLY what I was looking for! |
 |
| Beautiful! |
 |
| Already doing its job! |
So another huge stride forward. I made the comment to Dad today about seemingly small projects taking forever. Who would have thought "Installing a Shelf" would take several hours. But the job was done right, and it will last forever! It's so sturdy! And it's water-proof (to an extent!) with the linoleum top!
It seriously looks great! The house is coming together!
But as I'm finding, I still have a bit to do to make this 100% wrapped up. Because the previous owner had the kick plate so far out from the cabinets, I'll have to take my saw and cut along the base of the cabinets again. And the kick plate is so faded and splintery that I'm not sure I won't have to replace it with new. I might be able to get away with a good cleaning, sand job, and coat of stain, but we will see. And while working down there today, I noticed I have absolutely no airflow from the vent! So either a damper is turned in the pipe, or it's off in the crawlspace somewhere. Always somethin'!
 |
| I'll have to cut this floor out again. This is how much spacing the previous owner/contractor had with his make-shift flooring turned sideways! Agh!!! |
But we're getting there! Total cost of today's project? About $10 after using the left-over materials. I'll take that any day.
And after that, we quickly assembled a trundle day bed I had picked up for free off the side of the road. I had to spend a couple of bucks in hardware for the frame today, but I'm listing it for $200! Every bit helps! It's actually quite gorgeous!
 |
| This was "junk" on the side of the road! |
Thanks for the help today, Pa! Looks great!


No comments:
Post a Comment