Tuesday, August 17, 2010

Re-Doing an Ugly Deck...My Favorite Post

If you own a wood deck, then you absolutely need to read this post.  I'll be honest, this is one of my favorites I've ever done.  I am still in shock when I look at the Before and After pictures.  It's simply hard to fathom.

Ok, so when I bought this foreclosure, it came with a decent-sized wood deck just outside the patio door.  It's actually kind of funny because it is VERY private!  Not only do I have a large privacy fence that wraps all the way around the backyard, but I also have a privacy deck!!!  Speculation is that the previous owners used to have a hot tub on the deck.  That's the only feasible reason that makes sense in my head, because it's kind of ridiculous!!!

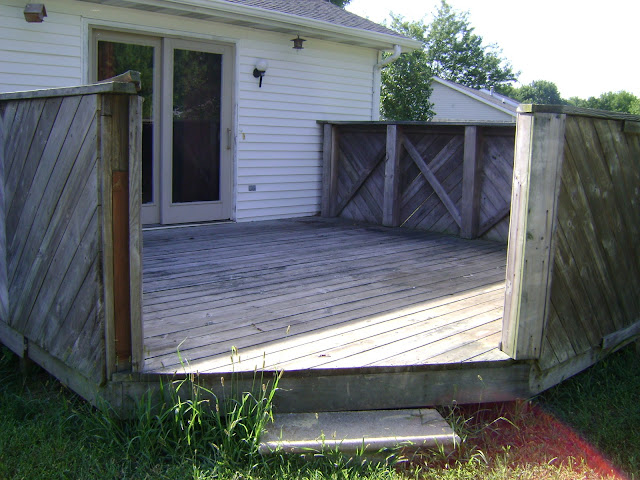
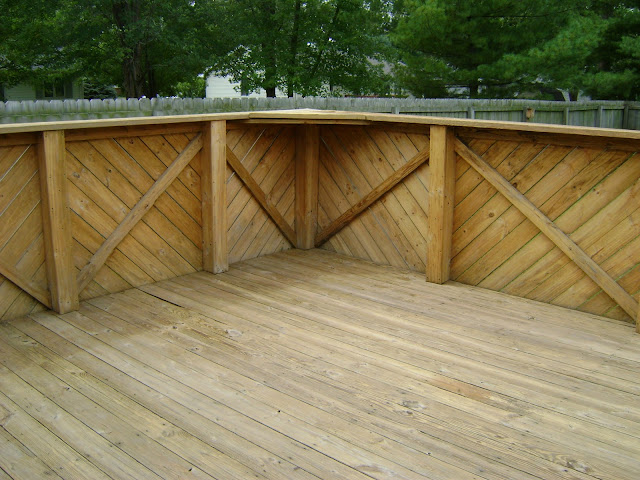
The large deck...and the even bigger deck walls!

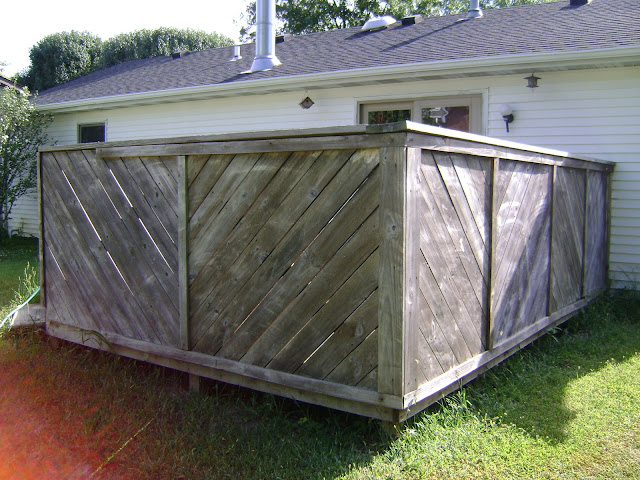
It wasn't really much to look at.

The view as you walk into the backyard.

This does not scream hosting party.
I  had considered removing the privacy walls from the deck, but I figured I would just keep them on.  The problem was that the deck was in terrible, terrible shape.  The wood hadn't been painted or stained in years, and it had that dismal grey appearance.

Well, lucky for me, I happened to stumble upon one of my best purchases ever a couple of weeks ago.  I was walking around the Habitat for Humanity ReStore when I noticed a LARGE box of paint and stain.  It turns out Lowe's had donated several items to this particular store, and this box was one of them.  I asked how much they were charging, and they told me just $1 a gallon!!!

Well, I found some wood stain in there!  And I mean I found LOTS of wood stain in there!!!  It had to be rather funny-looking, but I gobbled up every gallon I could find.  I was filling up a couple of carts trying to make sure I found every one.  A ccouple of people noticed, and out of courtesy, I asked if they were interested, and I ended up sharing a couple gallons with others, but the majority was mine!  I was thrilled!

If you can believe it, I walked out of there with 18 gallons of stain.  And it only cost me $30.
 
One of my best deals ever found.
Once back at home, I searched for the same product on the Lowe's website and found these gallons going for $24.97 apiece!!!  I had just purchased $749 of stain for $30!!!  That puts such a smile on my face!

Thank you, Lowe's!  And thank you, Habitat!!!

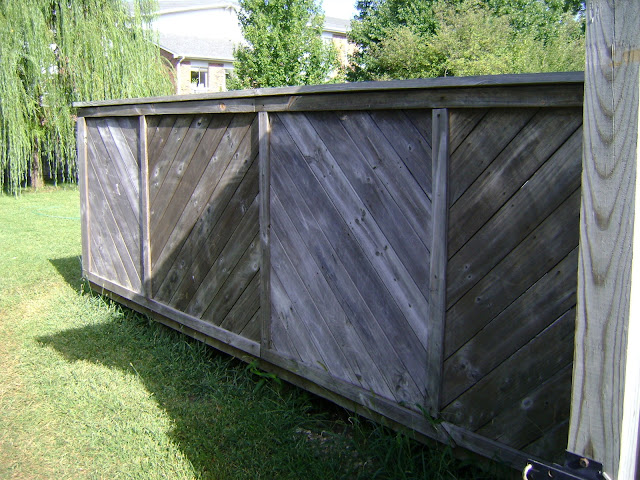
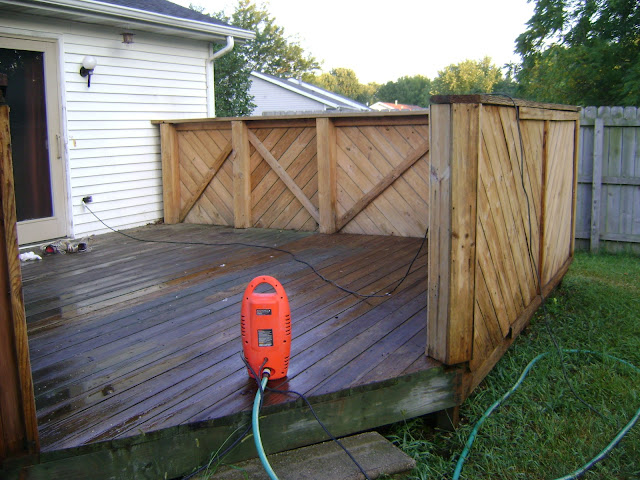
Well, now that I had the stain, I figured I might as well get the deck prepared for it!  So I borrowed my dad's powerwasher in order to clean the deck.  At least this is what was recommended by me reading some suggestions on the internet.  But I was nowhere prepared for what would happen before my very eyes.

It's still hard for me to believe!  But as I would take that powerwasher over the wood, the exterior rot would melt away, exposing a BEAUTIFUL solid wood underneath!  It was incredible!!!  With every pass of the wand, my deck was being transformed!!!  The old was becoming new before my very eyes!!!

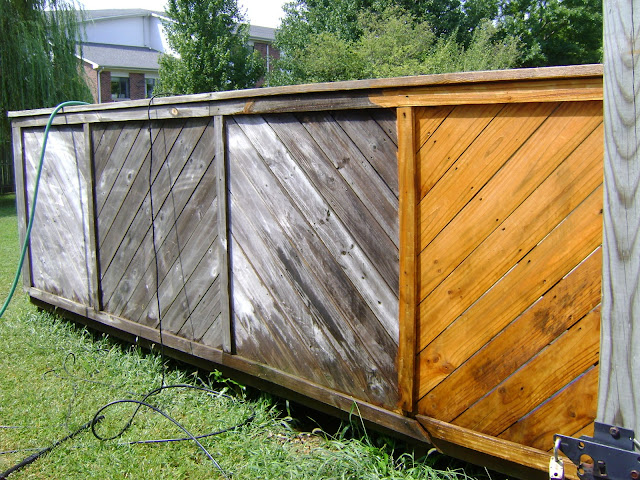
I was magically bringing back my deck!

This doesn't even make sense in my head!

Would you look at that?!  It's going from dead...to new again!

I had the will to carry out this entire project to completion no matter how hot!
Of course, that only made me want to continue the project all the more!  The problem was that I chose one of the hottest days of the year.  The temperatures sored into the 90's with the heat index in the triple digits.  There was no wind, and the sun was nearly unbearable.  I was happy to have some mist catching me, but it was just burdensome today.  HOT HOT HOT.

But I pressed on, just fascinated with what was taking place with my deck.  What is more, this was just a simple electric presssure washer from Black and Decker!  It wasn't commercial-grade by any means, and it had no gas engine!  But wow, was I getting my money's worth today!

I would alternate between walls and floors.  The floors didn't clear up quite so well, as some had had some mold and mildew stains, but they changed colors nonetheless.  But wow, what a ton of surface area this deck had!  Outside walls, inside walls, crevices, floors.  Ugh.

Moving inside to the very mossy floors.
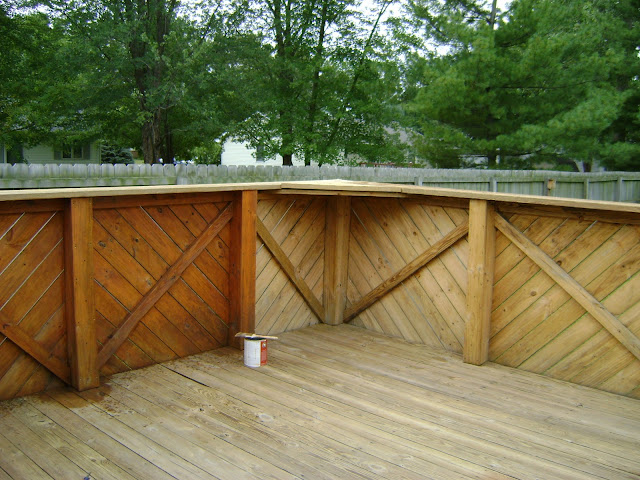
The walls are done!

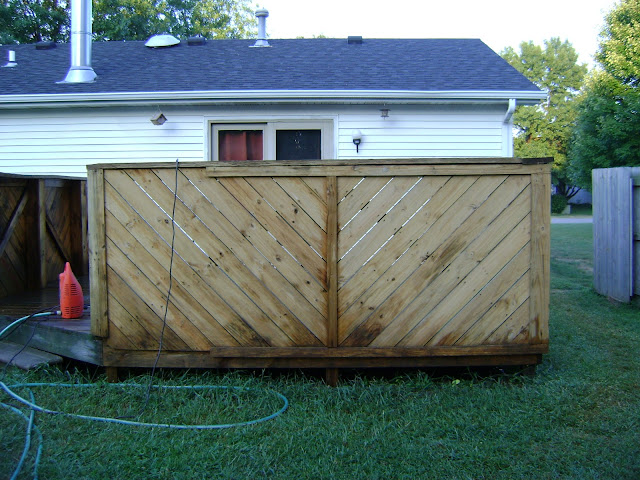
The difference is phenomenal!!!
I ended up pressure-washing for 8 hours!!!  That was a lot to ask of the little guy, but she held up to her end of the deal.  The deck was gorgeous.  I'm not joking when I say it looked brand new!!!  I had taken a dilapidated old deck and made it look like a $3000 deck in one day.  Frankly, I quite liked the deck as it was before the stain!  The original color of the wood looked great!!!

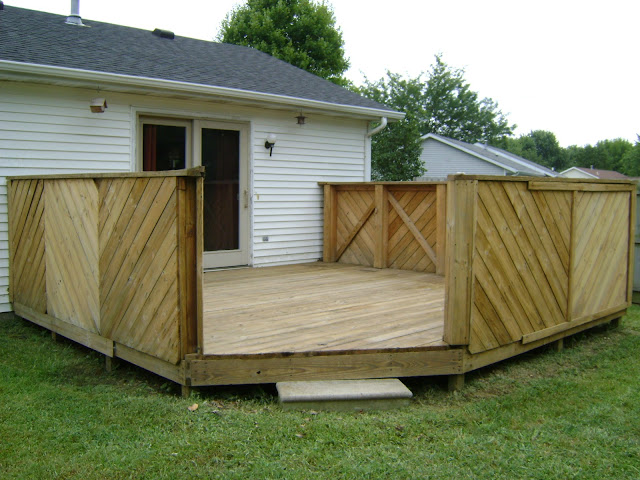
My "new" deck!!!  She looked even better after she dried!

Looks like it was just installed!

Absolutely no comparison.

The inside is now warm and inviting!

Beautiful "new" floors!
But I knew I had to stain it to protect it from looking like this again, so I started that long chore.  The color was a redwood stain, and although I didn't like it as much as the original wood, it sure made this deck look great.

Starting to stain the deck.

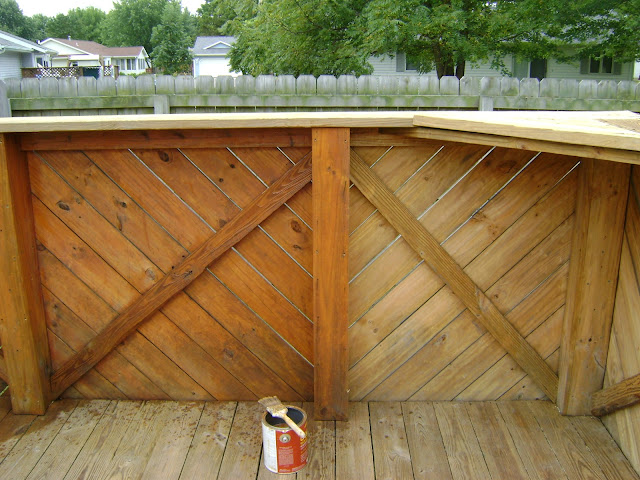
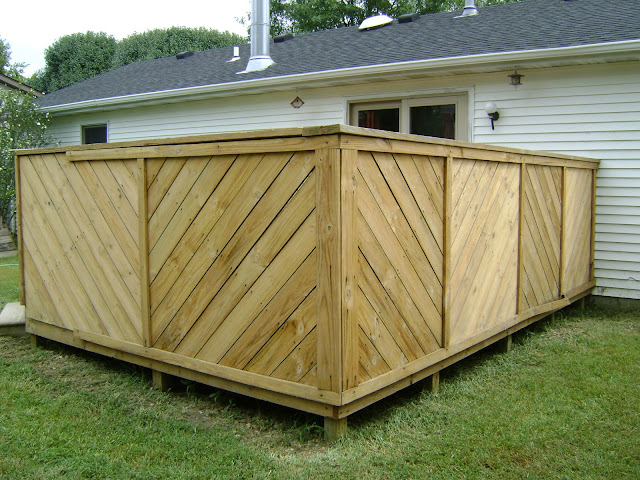
I like the original color better, but that's ok!  She needs protected!

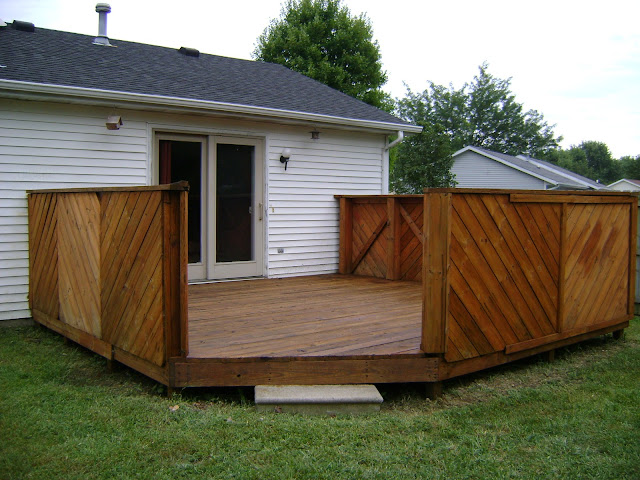
The finished deck!!!
Of course, no post is complete without pictures of the Before and After right next to each other, so...here you go!

Before...

During...

After!!!
I tell you, words barely capture the feeling of satisfaction on this project.  I had taken a very unattractive deck and made it look brand new!  And all it took was two days...a little bit of sweat...lots of patience...and $18.  [Actually, I have to be honest.  I ended up selling 15 gallons of the stain after realizing I had plenty.  I kept back a few gallons for me for future use, but I sold 15 gallons at $10 a gallon.  So if you can believe it, I was actually PAID $132 to re-do my own deck!!!]

It's hard not to smile writing that.  :)

Wednesday, August 4, 2010

How to Hide Poop

Every once in awhile I will get a project that is not for my houses at all.  And those are often equally as rewarding.  My friends own a horse ranch that rescues abused horses and pairs them with children (Refuge Ranch).  I have volunteered my help out there numerous times, and today was no different.  I was asked to oversee the construction of a wall to hide poop.  Yup, you read that correctly.

The owner of the ranch told me that she didn't like seeing poop when she pulled up the drive, and she didn't like the idea of her volunteers and children and families seeing poop, either.  She wanted it hidden!

Well, fine by me!

The project was pretty simple.  We used a small tractor to dig three large holes to hold railroad ties.  Once those were set, the only chore was to nail up boards straight-and-level!  Too easy!

And last, the volunteers were asked to stain the wood.  Seriously, with so many hands at work, this project was complete in no time at all!  It was amazing to watch that board get stained!

The new wall to hide manure!

The reason for the wall!

A fun little project with a purpose.


A very satisfying day.

Tuesday, July 20, 2010

Hay is for Horses!!!

Once again, I was able to get away from the house projects and do a little work for someone else!  My brother and I were asked to build some sort of device that would hay for horses without making a mess all over.  Basically, horses were dragging very good hay out of the feeding trough and then trampling it into the ground where they would not touch it.  Day in and day out, this made a lot of hay go to waste at the horse ranch.

So our job was to come up with an idea as to how to change that!  After looking at numerous ideas on the internet (most out of steel), we decided on a specific plan.  We would devise a contraption that would hold a hay bale, and the horses would have to work to get it.  I was told that this was actually a good thing as it keeps horses from being lazy!

Ya see?  We knew what we were doing!  Kind of.

Well, after a couple of hours, we had ourselves a horse feeder!  The first one went a little slow as we were also making a blueprint for others to be built long after we were gone.  The ranch wanted to have several placed around the pen, and we needed to come up with the model first!

We were pleased with our project!

Stick the hay bale inside, and close the door!

A goofy-lookin' idea with a specific purpose!


Of course, it didn't matter how much we liked it.  What mattered was whether or not the horses would be able to figure it out.  Well, not even two minutes after we placed it in the pen, the horses came over and knew exactly what to do.  It was pretty satisfying!!!

We have success!

They are workin' for it!
We ended up building two that day.

Thursday, July 1, 2010

Re-Landscaping an Abandoned Foreclosure: Part Two

Now that the mailbox area was complete, I decided to focus on a much larger area of the frontyard.  Once again, the previous owners had landscaped with rocks, but the weeds had conquered the weed barrier and started to outnumber the rocks.  It was time to clean it up.

The weedy landscaping.

The weeds could grow better where the water came out of the gutter!

I also had a lovely bush left for me.  There are rocks in there if you believe it!

The view just before you walk inside the front door.  Bleh.
I had considered just spraying the weeds with weed killer, but I knew that more would just come up without properly taking care of the degraded weed barrier.  Of course, I also knew that this would be a much larger project this way, but hey, a job that is worth doing is worth doing right.

So first things first, I pulled up all of the river rocks and hauled them over to my driveway.  I was acquiring quite a collection over there between these and the previously-pulled purple rock from around the mailbox!

The river rocks are gone!

I would re-use these after I fixed the weedy area.

The problem was all of the new rocks that were UNDER the weed barrier!  AGH!!!

She looks better already.
Once the rocks were up, I ripped up the basically worthless weed barrier and wasn't too happy at what I found. The previous owners had taken a shortcut and simply applied weed barrier over a different style of rock...then put down new rock. What that meant for me was that I now had to pull out all of the purple rocks from the dirt...not an easy process. I wasn't too thrilled about that! Agh, why can't people do things right?!!!  This project just turned a little bit bigger.

But before I could clear out all of the newly-found rocks, I needed to take out the large bush that had been left at the end of this landscaping area. I mean, it was clearly dead, but the previous owners didn't remove the stump or roots...they just cut it off above the ground. So I called my brother to help me with that project. We did it the old-fashioned way...with sheer muscle and hand tools. I tell you that was work! We dug down below the ground and cleaned up the roots so that we could cut them, but this was a huge bush!!!  It took us quite a while!

This bush had some thick roots!  The damp soil didn't help.

The monstrosity is removed!
After the bush was removed, I could focus on removing those pesky purple rocks.  But it didn't help that the area was pretty damp. The rain would come every couple of days stifling my progress. It was often hard to see the purple rocks in the soft dirt, and even when you could, they didn't always separate from the dirt as easily as I would have liked. I even tilled the dirt up several times, but being damp, the dirt wouldn't get very fine...it would clump up, so it kind of made it harder to tell the difference between a rock and rock-sized dirt clump!

What a pain!

But I worked to get them all out. Now that the rocks were removed, it was clear that I needed more dirt. LOTS more dirt.  I needed the water to drain away from the house, so I wanted a slight angle in the dirt. But after removing all of the rocks and the bush, it was clear I couldn't properly do this. So I picked up a couple of truckloads from a horse ranch here in town. And that did the trick!!! I was able to fill in all of the low areas and achieve my slight angle away from the house. It was now time to put the original river rock back down!!!

Adding more dirt to the area.  Just follow a brick line to see the difference in height from side-to-side.

Adding more and more dirt and then tilling it up!

Filling in the areas that I knew would sink the most.
I called my sister up for this project!  With the winds, I just wasn't able to hold the weed barrier down!!!  So we worked on getting all of the barrier down, then hauling the rocks back to their original place.  What made it difficult is that I wanted to do the project right!  So as we would haul the rocks back over, I made sure that no purple rocks were intermixed in the rocks on the driveway.  Boy, was that a chore!  My brother helped me with that!  After all was said and done, we ended up pulling out quite a bit of purple rocks!!!

Laying the weed barrier back down.  The wind made it difficult that day!

Trying to be strategic about holding the barrier down!

As we came closer and closer to the end, I realized I was WAY short on rocks!!!  How could that be?!

Putting rocks on the seams first.
The mess of rocks on the driveway.  Some were river rock, others were purple.  Sigh.

The mess that was left over after we pulled out the final river rock.  What a project!
So I found myself with the clean river rocks back in their place...but nowhere close to enough of them!  I had to go buy some more.  After buying five bags from a landscaping store, I quickly returned four of them after realizing that I would need LOTS more.  For a cheaper price, he was able to sell me a 1/2 ton load.  Perfect.  So I burdened my shockless truck with a load of rock!  But that did the trick.

The final touch was buying boxwood bushes from Lowe's.  Mom and I planted those, and the area looks sooooooooo much better!  I can also take pride in knowing that the job was done right.  The water drainage should be much better, and the weeds should stay down.  I'm happy with that.

The new landscaping!

No more weeds!

So much better.
Thanks to everyone who joined in on the fun!  A job well done!

Fun Fact!  So I had a bunch of purple rock just sitting in the driveway doing me absolutely no good.  So I put an ad on craigslist saying they were free if anyone wanted them.  Well, a gentleman asks me if he could have them.  Sure, I say.  Well, he shows up with his three young daughters (high school and under), and my jaw drops as he puts them to work shoveling this rock onto a trailer!  It was quite a sight!  Either they were in trouble or he is teaching them some valuable lessons.  I offered to help, but he wouldn't let me!

Well, fast forward a few days, and I get this short email...

Good Morning,
Those rocks worked us pretty hard, but we survived. There were just enough to do the whole project. Check out the attached pictures, and let me know what you think.

And he attached three pictures for me to see!


I tell you, there is some sweet satisfaction in knowing that my worthless rock was put to good use.  Thanks for the follow-up email!!!  And nice job, girls, on a job well done.

So my house looks better, and someone else's house looks better.  I'll take joy in that any day.