Thursday, September 20, 2012

Oh, Those Ugly Stairs!!!

One of the biggest updates on my to-do list was my basement.  I included the whole basement in there as EVERYTHING needed updating.  The stairs, the walls, the floors.  My main bathroom was priority #1 in the home, but now that that project is complete, I could focus my attention on the basement.

The dark, dungy basement!  Certainly not too appealing a place!

It's such a great room of the house but has no appeal!!!
I first started with the stairs.  I had researched numerous before-and-after pictures of others re-doing their stairs, and I concluded that I liked hardwood floors.  But I had a mess to get through to get to the original wood.  Let me see if I can describe this in full.  My basement stairs had a soft, red protective cover that was held down by metal on the edges.  Below this cover was a coat of black paint that was painted over brown paint.  The red mats appear to have replaced previous mats, or else the owner simply painted around the red mats, as some exposed wood was beneath the red mats.

The stairs after removing the red pads as seen on the basement floor.

Certainly sturdy but just not much to look at!
Needless to say, I had my work cut out for me.  I tried paint remover, but that was quickly becoming a mess.  A very dirty mess.  I tried sanding, but I didn't like that method, either...my sander simply wasn't penetrating the two layers of paint.

So before I could even start the project, I did an about-face and went an entirely new direction!  Instead of bringing back the original hardwood which was appearing very elusive, I decided to just repaint the stairs in their entirety!

I first started with the vertical wood which I chose to paint white.

Painting the stairs...

It's lookin' great!


I then pulled out my $1 paint from Wal-Mart and started painting the horizontal pieces.  I had debated going with a black-and-white theme, but the more pictures I found, the more I realized that my home didn't quite match up with such fancy stairs.  I am happy with the colors I chose...the results are simply night and day.

Now painting the horizontal portion with my cheap $1 paint!  :)

I am beyond thrilled with the results!!!
I opted to keep the iron railing off of the new stairs.  I feel like the piece is from 1960 and doesn't match the new look I am going for.  I LOVE the new stairs.  It's amazing what a little work can do.  :)  Now that the stairs are fixed, I am forced to continue updating the rest of the basement!!!  Oh, what work this is going to be!!!  But what a GREAT start!

Friday, September 7, 2012

Shutter Time!!!

I don't know if it's a gift or a curse, but one of the easiest things for me is making an idea list immediately while walking through a home.  I instantly categorize what needs to be done and can usually prioritize things on the spot.

Well, when I bought this Cleveland home last year, I knew without a doubt that one of my biggest desires was for more curb appeal.  And that curb appeal would come instantly in the form of shutters.  I could tell that this home used to have shutters, but some time ago, they were removed for whatever reason.  I love brick homes, but this home just needed some color!!!

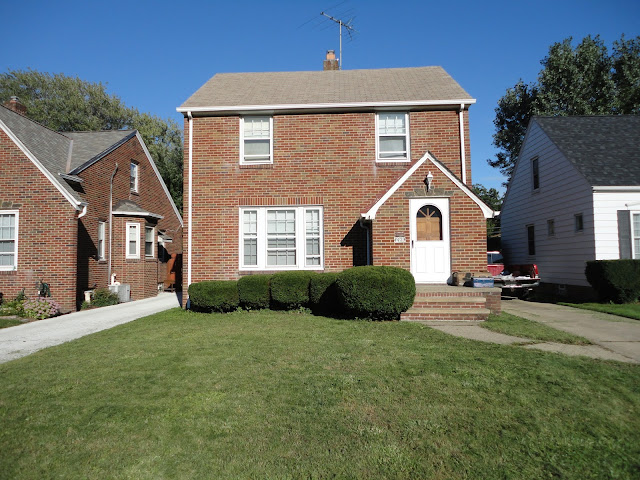
I love this home, but something is missing!!!  I need some accenting color!!!
So I was off to shop for shutters.  It's funny to me, too, just how passionate some people can be about certain things.  Well, in my research about how to measure shutters, I came across a gentleman who is all things shutters, and he actually influenced me greatly!!!  You can read all about shutters here (More Than You Care to Know About Shutters).  However, I warn you:  You will NEVER look at shutters the same way again...and will probably realize that your shutters on your own home are installed improperly.  You've been warned!  :)  I learned soooooo much, and I took it upon myself to pass that knowledge on to my sister, too.  Now we can't drive down the street without noticing the 90% fail rate of proper shutter installation!

It's basically simple.  The shutters we see today on homes are simply an extension of the original purpose of shutters back in the 1800's and early 1900's.  The difference is that today shutters are for aesthetic purposes only.  They don't open or close or even turn with the louvres.  They quite simply give the appearance of actually being useful...that's it.

So with that said, the easiest way to figure out if a shutter is installed properly is to picture it in 1850!  Could the shutter close on its hinge and fully cover the window glass from top to bottom?  If so, would it cover the window from left to the middle (probably the biggest failure of current shutters)?  Of course, it can get a wee bit complicated when you have curved windows (your shutter better be curved, too!) or windows in between windows.  But for simplicity's sake, a shutter should cover a window fully.

Well, after much research and pricing, I did what any sane man would do.  I went with something that would look good...be reasonably priced...fit in with the neighborhood...and not hold up to the shutter test.  Yes, much to my own dismay, I had to break the shutter rules!!!

But, alas, that's the route I took.  I debated long and hard between maroon and blue shutters and even cheated by playing around with shutters and my actual house on the internet.  I chose blue.  I ordered eight of 'em from Lowe's and eagerly awaited for them to arrive!

I don't think I knew exactly what I was getting into, but that seems to be typical for me anymore!  ha!  I had to purchase a couple masonry bits, and I used my battery-powered drill for the power.  But even then, this was going to be a project that required some muscle!

Going off a tip from the internet, I measured the depth needed for the masonry anchors.  I then took a piece of masking tape and put that same measurement on the drill bit.  Now I would know when I needed to stop.  I then started drilling through the 1939 mortar!!!

Long story short, I would have to drill six holes in each shutter.  They were to be 3 inches deep.  So I had to drill 8 shutters...6 times...3 inches.  In other words, I would end up drilling through 12 feet of mortar.  OUCH!!!  No wonder my arm was tired!!!

But the final result is worth it.

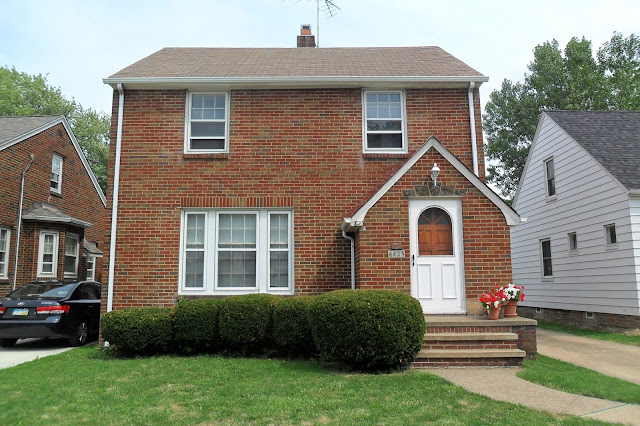
My house before shutter installation.

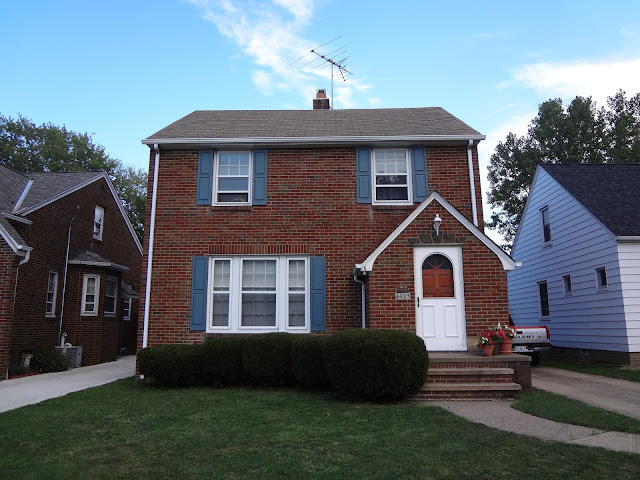
The house is completely transformed!  So much more "home-y"!

The home as seen from across the street.

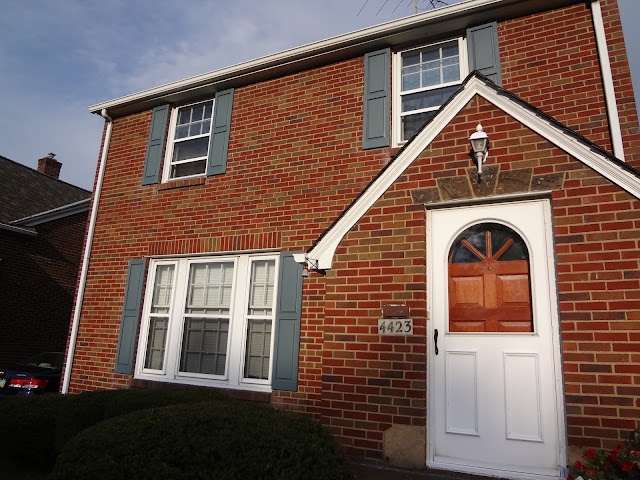
Such a small change.  Such a big difference.
The shutters only cost me $165.81.  Add in the drill bits, anchors, and ladder rental, and I was able to transform the look of my exterior for $200.  I LOVE it!!!

Thursday, September 6, 2012

Good-Bye Bright Orange Shelf!!!

When I first bought this house, I had a rather large list of to-do's that I knew had to be done.  The biggest ones (or most desired) were pursued with fervor, and others would remain on the list untouched until their due time.

Well, one of those early list-makers was tackled today.  This home has a cute little "breakfast nook" room that I think would be one of the most-used rooms in the house.  When I purchased the home, this was a playroom.  Seeing as how I have no kids, I wanted to make it a cozy room with a loveseat and fireplace.  It came with a bookshelf that I chose to keep...but a very, VERY bright orange bookshelf.  I wanted to change the color.

I had some unused $1 paint from Wal-Mart that would do just the trick.  One day I was walking through Wal-Mart and saw a cart full of gallons of paint.  These cans had been custom-ordered, but for whatever reasons, the customer didn't like the color and left the store without them.  A full gallon of paint for $1?!  Absolutely!!!  I had originally picked them up for birdhouses, but the paint is good for anything!

So I pulled out one of the gallons and started painting the bright orange shelf.  I chose a soft-chocolate brown color that I ended up loving.

This children's playroom was a little bit too "loud" for me.  :)

What a change!  I love it!

The shelf coming together!
I was quite surprised at the tedious work involved...it turns out that there is more surface area to a shelf than you think!  But when you see the goal come closer and closer to reality, it sure makes it a whole lot easier to finish a project.

A brand new room!  New shelf, new curtains, painted floor trim.

So much more professional!  I am so pleased with the results.
I am absolutely THRILLED with how the shelf turned out!  This room is one step closer to bein' oh so comfy-cozy.