Friday, May 4, 2012

Day Nine: The Massive Bathroom Project

Well, I was ready to grout the floors!!!  I had already gained some experience by grouting the bathtub tiles, and I was hoping that this wouldn't be any different!

I was very happy to learn that it was just about the same!  Fill in the gaps, push it down, push over it some more, move on.  Then wipe up the mess at the end!  Seriously, it's not that hard at all.

But the difference is night and day.  Another skill learned!

The bathroom floor is done!!!

I carried it into the closet, as well.

Words don't really capture my satisfaction with this job!  I'm so pleased!

This bathroom looks NOTHING like it did last week!


The grout dried to a lighter color, and I think I like that even more!!!

Day Eight: The Massive Bathroom Project

Well, the big bathroom project was almost done!!!  But I wasn't out of the woods yet.

My tub contractor had given me the idea of a new product that he loved to use.  It's called TrafficMaster.  I had never heard of it before, but it's basically ceramic tile without the ceramic!  ha!  I checked it out at Home Depot, and the floor display had me sold.  You could do it with or without grout, but far and away, the grout was the way to go.

I bought myself several boxes, some snips, and headed for home.  But I have a confession first...this wasn't my original intention.  This was only after a previous project went south in a hurry!!!

You see, I had learned that you could paint tiles yourself, and after seeing the job done by a professional, I wanted to try my hand at it.  haha...I was worthless.  I have the confidence to try anything, and that can get the best of me.  This was one of those times.  I had placed a primer seal over the floor, and well, it looked terrible.  At least the floor was now primed, right?!

My "new" floor.  A failed project.  I simply primed the floor tiles, hoping they would look new.  Not so much.

The ugly old color was gone.  But up close, this wasn't that much better!  A failed project!
But I was smart (wise?) enough to see that the results weren't as expected, hence me going after the tiles.  The tile project itself was pretty fun.  Because these aren't ceramic, you don't need any special tools outside of tin snips.  And when it comes down to hard corners...well, there is no such thing!!!  I would simply make a mark on the tile with marker, then cut it with the snips!

Don't get me wrong, the project was a bit tedious.  The tiles aren't perfectly square (don't believe the box!), and making same-width tile spaces was a bit of an art, but the difficulty level is pretty low.  It just takes time and patience.  And a few tough fingers for cutting!  These tiles are tough!!!

Laying down the tile.  All you need are some snips and some patience!

The best part is that you can follow the shape of anything!  Check out my wood trim piece!  I was proud of that one!

No dust, no saw, no concern about circles!  Just cut and place!
One by one, though, the tiles came together, and after each square-foot went together, my excitement grew more and more.  This bathroom was starting to look sharp!  It looks NOTHING like the previous one!  And that has me very, very excited.

I was able to follow the contours of the wood trim, the newly-exposed bathtub, and the toilet flange.  Seriously, this stuff is incredible.  It sure took the work out of tile cutting!!!  And perfect cuts were possible!

The floor is ready for grout!

I LOVE my new floor!!!  Agh, this is so rewarding!!!
I'm completely sold on the new tiles.  Now all I have to do is grout.

Sunday, April 29, 2012

Day Seven: The Massive Bathroom Project Revealed!!!

Well, I came home in nervous anticipation!!!  It's so fun having childlike Christmas Eve wonder as an adult.  I hope I never lose that!!!

Had he been here?!  Was it done?!  What did it look like?!  Did he remember to leave the black tiles as requested?!  Am I going to be pleased?!  Am I going to hate it?!  What did it look like?!

I eagerly climbed the upstairs and turned the corner!!!

WOW.  Wow wow wow.  My bathroom was sooooooo different!  It was soooooooo bright!!!  Agh, look at that tub!  It's beautiful!  Look at those white walls!  They look so clean!!!  My bedroom across the hall even had a different look!  It was so bright with the sun reflecting off of the new white tiles!!!

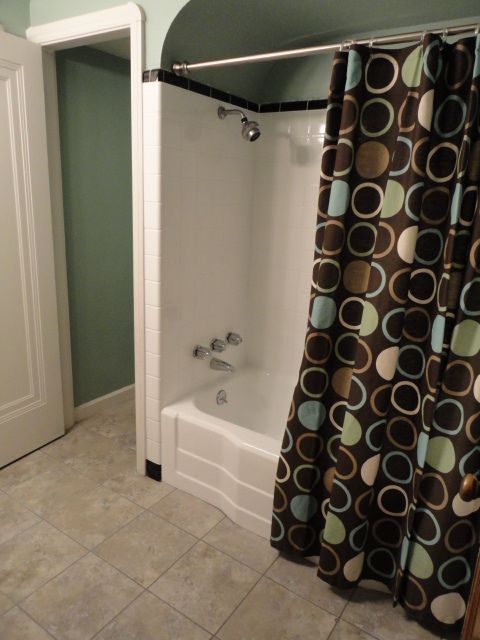
The new bathroom!!!  It is soooooooo white!!

I am so happy!!!


The bathroom is so different!!!

One of the best surprises was the original tub!!!  Look at those contour lines!  It's gorgeous!

Of course, I had to rush to get my new shower curtain!  I LOVE my new bathroom!!!

It doesn't even look like the same room!

I'm seriously oh so happy.
I was beyond pleased.  I literally had a brand-new bathroom on my hands.  The one big disappointment was that the company had left the tub drain and handles off, but a quick phone call chnaged that.  He had expected me to reinstall them, and I was kind of shocked at that.  Oh well, he came out and did it himself.  Perfect.

While here, he told me that this was one of his harder projects.  I guess my cast-iron tub was in horrendous shape.  It was filty and incredibly rusty.  They had to spend more time than they were used to sanding it down.  But their work paid off.

I love it!!!

Of course, the problem now is that I have no toilet...and my floor looks all the more hideous!  That needs to be changed soon!  Now that the rest of the room is bright white, the salmon floor is gross!!!

But this project exceeded my wildest expectations.  The cost to have everything refinished was $1200.  But I feel that I increased the property value way more than that.  This used to be the weakest room in the home.  Now it's an attractive, bright, and clean bathroom!

It's time to get the toilet and vanity installed and be done!!!