Thursday, April 12, 2012

Day Three: The Massive Bathroom Project

Well, I wasn't looking forward to it, but it was time to tackle the other two tiles.  And sad to say, as expected, they were not easy to remove, either.  I figured with the large protruding pieces of towel rack, the tiles would break off easily.  I was wrong.  The towel rack portion would indeed break off (though not easily)...but then I would have an uneven tile left for pounding after that.

The two black towel rack tiles to be knocked out.

Some of the hardest work I've ever done!  These were so difficult to remove.
Sigh.  This was not going to be a fun...or quick.

So with nothing more than muscle, sweat, time, and determination, I worked on removing the remaining two tiles.  It was certainly a chore, but I was finally able to remove them.  I had a couple of problems today.  First, now that the shower doors were gone, the pieces would literally fly all over the bathroom.  When I chipped them away, I could hear the tiny bullets hit all parts of the walls and floor.  Second, the left part of the towel bar was right in the corner.  This made it a little more difficult to chip out.  At times I just wanted to go crazy and hit the tiles like a mad man.  But I exercised restraint and just slowly chipped away...

The first tile is out!

Just one more to go...in a precarious place!

Before...

After!!!
Just like last week, these tiles created quite a mess in the bathroom.  Contrary to what the internet led me to believe, these tiles did NOT break into a few pieces and pop right out!  Someone needs to show a video of a 1939 house, not a 1989 house!!!  What a difference!

The two tiles in a slightly different form...

All swept together.
Just like last week, it's now time to install some bright white tiles to replace these huge black tiles.  After I wrap that up, I'll grout them...which will be another first for me.  But that's how you learn!

So yet another slow but successful day.  The remaining two tiles are out, and now I just need to install and grout them after they dry.  After that, I'll have to remove the toilet and vanity, and this bathroom should be ready to be refinished!!!  Slowly getting there...

Saturday, April 7, 2012

Day Two: The Massive Bathroom Project

I love the internet.  The problem with the internet, though, is that I have every possible remodel project at the palms of my hands!  And I have learned over the years that if there is one thing that I know, it's that if someone else can do something, then so can I.  (Be careful:  This can get you into BIG trouble on some projects!).  But it sure is fun for me to get ideas, test them through other's mistakes/successes on the internet, and then try them myself.

This bathroom project was to be no exception.  So here's the deal.  I have NEVER worked with tile before.  I have really had no reason to work with tile.  But now I have a bathroom that is covered in hundreds of salmon-colored tiles.  And after some hard thinking, I have decided that I am going to KEEP THEM!  Yup, you read that right...not only am I going to go with refinishing my tub, but I am going to go ahead and refinish my entire bathroom, as well!!!  Agh, it sounds downright crazy.  But the more I read, the more I am convinced that this could work!  It's not the cheapest project, but it will save me thousands over a full bathroom tear-out and remodel.

The problem is that I have to get the bathroom ready to be painted.  Basically, the tub refinishers come in and prep and paint the tubs and tiles.  But that's it.  That's their job.  It's like taking an old car and having it redone.  The painters do the sanding and painting.  But first there needed to be some "body work" done.  That was my job.

The first order of business was removing two Christopher Columbus ship tiles IN my tub!  I didn't want them, and they needed to go.  I had NO idea just how difficult that would be.  The internet videos and blogs all told me it was going to be easy.  I went to Lowe's and bought the necessary tools, and I started grinding down the grout.

One of the two colorful ships in my tub.  The tiles were actually raised grooves, so I couldn't just paint over them.


Inside the bathtub.
Well, I grinded and grinded and grinded.  This stuff was (like?) concrete.  I'm learning that this house is structurally sound.  All of the videos that I watched were from homes built in the last 20-30 years.  If someone wanted to tear out a tub, they just took a hammer to it, and it broke into large pieces.  Well mine, not so much.

I would literally spend an hour on EACH tile!  I would grind down the grout with a special tool and then start chipping away the tile, trying to break it.  The problem was that the mastic on the back was so strong that the tile wouldn't budge.  It would literally break into a MILLION pieces!!!  I had to wear eye and hand protection as these pieces were flying off like bullets in every direction.  Every smash of the hammer would send pieces flying.  But the pieces were so tiny!!!

I was getting nowhere fast.  So it took me two hours for two tiles.  Sigh.

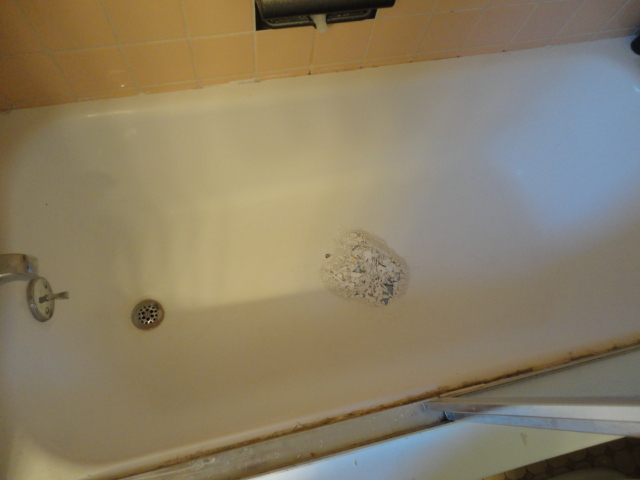
The two tiles now removed after hours of work.

They did NOT break up into large pieces at all like others said!  Millions of tiny fragments.
What work this is!  It's tiring swinging a hammer that many times!  And it's just downright amazing at how little progress I make.  I decided to go ahead and remove the glass shower doors, too.  I didn't care for them, as they seemed too 1980's for me, so I had no problem taking those off. And it was very simple. I just removed some screws from the tile walls and pulled the rest off. It was caulked something fierce onto the tub liner, but that liner was going to go anyway. I didn't care.  I was amazed at how much bigger the bathtub area appeared, though!  It was like its only little enclave now!

Before removing the shower doors...
After removing the shower doors!
The large amount of caulk and sealant below the old glass shower doors.
Now for the rest of the story.  I had originally planned on removing only the two ship tiles, but after removing the shower doors, I noticed that a previous owner had simply just chipped away at an old tile towel bar rack in order to get the doors in.  Some people!!!  Agh, just do a project right, please!!!

Where the shower door used to rest.  The previous owner just simply cut away the tile to make it fit.  Sigh.
So I was now stuck with replacing a towel rack tile piece.  I searched high and low for one and actually found hundreds at a local Cleveland ReStore but none in my style.  But the more I thought about it, the more I was ok with just getting those tiles out of there.  I didn't need a towel rack IN the tub.  I already had to remove one of the tiles...so why not just remove both...

Oh, boy, what had I just decided.  That project would have to wait until another day...I didn't have enough arm strength left.

Friday, April 6, 2012

Day One: The Beginning of the Massive Main Bathroom Project!

When I first purchased my Cleveland home, the biggest two weaknesses were the main bathroom and the basement.  But being on a very limited budget, I had to postpone working on these two projects for some time...all the while knowing that they needed to get done.

Well, as seems to happen, the days passed, and I worked on some smaller projects first.  I updated the exterior by adding shutters (which I love), and I painted the kitchen and downstairs bathroom.  The home was being updated little by little, and on a budget, that is simply what you have to do.

Well, it came time to tackle the behemoth.

First, let me describe this bathroom to you.  The home was built in 1939, and the bathroom is original almost down to its core.  It has been painted a salmon color to match the salmon tires which extend halfway up the wall in the majority and almost all the way up the wall in the bathtub itself.

A very ugly flower wallpaper border went around the top of the walls, and a very dated sliding glass door was put on top of a replacement tub liner.  Oh, and I can hardly forget!  Inside the bathtub were two very important tiles:  SHIPS!!!  Yes, no bathroom of the early-to-mid 1900's is complete without some sort of decorative tile. I ended up with Christopher Columbus ships complete in full color.

Sounds like a bathroom YOU would like to own, doesn't it?!!!


The bathroom before. A huge, old vanity and tiles everywhere!


The bathroom before...


Hideous wallpaper border, towels for curtains (I'm not kidding), tall ship tiles, glass shower doors...and lots of tiles!


You're jealous, I know.

Well, first things first.  I decided to paint the bathroom.  I had considered re-doing the entire bathroom (pulling out all of the plaster walls, etc.) at the recommendation of a plumber who came to fix a tub leak, but after his $3000 estimate for the job JUST to see what was behind the walls, I said, "Thanks, but no thanks."

Before I could paint, however, I had to remove the wallpaper border.  The good news it that the wallpaper border came off oh so easily!!!  I literally just grabbed one corner, gave it a pull, and it pulled itself off the rest of the way around the bathroom!  Too easy, right?!


The ridiculously unmatched flower and wheat border on top.
The wallpaper border peeled right off in one minute!
Well, the bad news was that this was due to the fact that this border had been placed directly on top of the original 1939 wallpaper border.  I'm not even joking.  What is more, 1/3 of this original border had been removed already...and I would quickly find out why it was only 1/3.

The surprise was this original wallpaper border that was underneath the other!  It was soooooo hard to peel off!
I started to remove the border myself, and what a chore that was!  This border was about the thinnest you could find, and it was bonded to the walls with some sort of phenomenal paste!  It simply did not want to remove itself from the wall!!!  I would spend way too many hours scraping the border with a razor blade.  The project had started out very, very slowly.

The old wallpaper border would peel off in teeny tiny sections.  That was work.

FINALLY both borders are gone!  It's ready for paint!
Well, I was finally able to completely remove the border, and I went ahead and painted the walls a soft green.  I had picked up this paint for $1 from Wal-Mart as it was a mis-matched paint, but I fell in love with the color after I had painted a birdhouse with it.  So much so that I painted three birdhouses with it!  I figured my bathroom would benefit greatly!

What a difference this paint is going to make!!!  I love contrasting colors!
The painting itself wasn't hard at all.  I'm too good of a painter to hate it as much as I do, and it's a discipline every time I start.  But as the walls get color, it gets easier and easier to finish.  I am just amazed at how much paint can change a room!!!


The walls are starting to change!!!  :)

Well, that was how it all started.  This six-week project had only just begun.  I would work during the week and then get two or three days off to work on the bathroom.  It wasn't quick work, but I had one goal in mind...update this room!

I am well on my way.  The bathroom took two days to paint...now it's time to tackle the tiles.