Saturday, April 7, 2012

Day Two: The Massive Bathroom Project

I love the internet.  The problem with the internet, though, is that I have every possible remodel project at the palms of my hands!  And I have learned over the years that if there is one thing that I know, it's that if someone else can do something, then so can I.  (Be careful:  This can get you into BIG trouble on some projects!).  But it sure is fun for me to get ideas, test them through other's mistakes/successes on the internet, and then try them myself.

This bathroom project was to be no exception.  So here's the deal.  I have NEVER worked with tile before.  I have really had no reason to work with tile.  But now I have a bathroom that is covered in hundreds of salmon-colored tiles.  And after some hard thinking, I have decided that I am going to KEEP THEM!  Yup, you read that right...not only am I going to go with refinishing my tub, but I am going to go ahead and refinish my entire bathroom, as well!!!  Agh, it sounds downright crazy.  But the more I read, the more I am convinced that this could work!  It's not the cheapest project, but it will save me thousands over a full bathroom tear-out and remodel.

The problem is that I have to get the bathroom ready to be painted.  Basically, the tub refinishers come in and prep and paint the tubs and tiles.  But that's it.  That's their job.  It's like taking an old car and having it redone.  The painters do the sanding and painting.  But first there needed to be some "body work" done.  That was my job.

The first order of business was removing two Christopher Columbus ship tiles IN my tub!  I didn't want them, and they needed to go.  I had NO idea just how difficult that would be.  The internet videos and blogs all told me it was going to be easy.  I went to Lowe's and bought the necessary tools, and I started grinding down the grout.

One of the two colorful ships in my tub.  The tiles were actually raised grooves, so I couldn't just paint over them.


Inside the bathtub.
Well, I grinded and grinded and grinded.  This stuff was (like?) concrete.  I'm learning that this house is structurally sound.  All of the videos that I watched were from homes built in the last 20-30 years.  If someone wanted to tear out a tub, they just took a hammer to it, and it broke into large pieces.  Well mine, not so much.

I would literally spend an hour on EACH tile!  I would grind down the grout with a special tool and then start chipping away the tile, trying to break it.  The problem was that the mastic on the back was so strong that the tile wouldn't budge.  It would literally break into a MILLION pieces!!!  I had to wear eye and hand protection as these pieces were flying off like bullets in every direction.  Every smash of the hammer would send pieces flying.  But the pieces were so tiny!!!

I was getting nowhere fast.  So it took me two hours for two tiles.  Sigh.

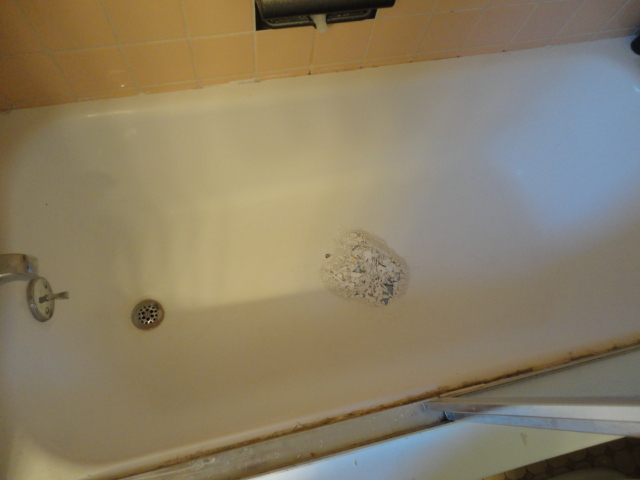
The two tiles now removed after hours of work.

They did NOT break up into large pieces at all like others said!  Millions of tiny fragments.
What work this is!  It's tiring swinging a hammer that many times!  And it's just downright amazing at how little progress I make.  I decided to go ahead and remove the glass shower doors, too.  I didn't care for them, as they seemed too 1980's for me, so I had no problem taking those off. And it was very simple. I just removed some screws from the tile walls and pulled the rest off. It was caulked something fierce onto the tub liner, but that liner was going to go anyway. I didn't care.  I was amazed at how much bigger the bathtub area appeared, though!  It was like its only little enclave now!

Before removing the shower doors...
After removing the shower doors!
The large amount of caulk and sealant below the old glass shower doors.
Now for the rest of the story.  I had originally planned on removing only the two ship tiles, but after removing the shower doors, I noticed that a previous owner had simply just chipped away at an old tile towel bar rack in order to get the doors in.  Some people!!!  Agh, just do a project right, please!!!

Where the shower door used to rest.  The previous owner just simply cut away the tile to make it fit.  Sigh.
So I was now stuck with replacing a towel rack tile piece.  I searched high and low for one and actually found hundreds at a local Cleveland ReStore but none in my style.  But the more I thought about it, the more I was ok with just getting those tiles out of there.  I didn't need a towel rack IN the tub.  I already had to remove one of the tiles...so why not just remove both...

Oh, boy, what had I just decided.  That project would have to wait until another day...I didn't have enough arm strength left.

Friday, April 6, 2012

Day One: The Beginning of the Massive Main Bathroom Project!

When I first purchased my Cleveland home, the biggest two weaknesses were the main bathroom and the basement.  But being on a very limited budget, I had to postpone working on these two projects for some time...all the while knowing that they needed to get done.

Well, as seems to happen, the days passed, and I worked on some smaller projects first.  I updated the exterior by adding shutters (which I love), and I painted the kitchen and downstairs bathroom.  The home was being updated little by little, and on a budget, that is simply what you have to do.

Well, it came time to tackle the behemoth.

First, let me describe this bathroom to you.  The home was built in 1939, and the bathroom is original almost down to its core.  It has been painted a salmon color to match the salmon tires which extend halfway up the wall in the majority and almost all the way up the wall in the bathtub itself.

A very ugly flower wallpaper border went around the top of the walls, and a very dated sliding glass door was put on top of a replacement tub liner.  Oh, and I can hardly forget!  Inside the bathtub were two very important tiles:  SHIPS!!!  Yes, no bathroom of the early-to-mid 1900's is complete without some sort of decorative tile. I ended up with Christopher Columbus ships complete in full color.

Sounds like a bathroom YOU would like to own, doesn't it?!!!


The bathroom before. A huge, old vanity and tiles everywhere!


The bathroom before...


Hideous wallpaper border, towels for curtains (I'm not kidding), tall ship tiles, glass shower doors...and lots of tiles!


You're jealous, I know.

Well, first things first.  I decided to paint the bathroom.  I had considered re-doing the entire bathroom (pulling out all of the plaster walls, etc.) at the recommendation of a plumber who came to fix a tub leak, but after his $3000 estimate for the job JUST to see what was behind the walls, I said, "Thanks, but no thanks."

Before I could paint, however, I had to remove the wallpaper border.  The good news it that the wallpaper border came off oh so easily!!!  I literally just grabbed one corner, gave it a pull, and it pulled itself off the rest of the way around the bathroom!  Too easy, right?!


The ridiculously unmatched flower and wheat border on top.
The wallpaper border peeled right off in one minute!
Well, the bad news was that this was due to the fact that this border had been placed directly on top of the original 1939 wallpaper border.  I'm not even joking.  What is more, 1/3 of this original border had been removed already...and I would quickly find out why it was only 1/3.

The surprise was this original wallpaper border that was underneath the other!  It was soooooo hard to peel off!
I started to remove the border myself, and what a chore that was!  This border was about the thinnest you could find, and it was bonded to the walls with some sort of phenomenal paste!  It simply did not want to remove itself from the wall!!!  I would spend way too many hours scraping the border with a razor blade.  The project had started out very, very slowly.

The old wallpaper border would peel off in teeny tiny sections.  That was work.

FINALLY both borders are gone!  It's ready for paint!
Well, I was finally able to completely remove the border, and I went ahead and painted the walls a soft green.  I had picked up this paint for $1 from Wal-Mart as it was a mis-matched paint, but I fell in love with the color after I had painted a birdhouse with it.  So much so that I painted three birdhouses with it!  I figured my bathroom would benefit greatly!

What a difference this paint is going to make!!!  I love contrasting colors!
The painting itself wasn't hard at all.  I'm too good of a painter to hate it as much as I do, and it's a discipline every time I start.  But as the walls get color, it gets easier and easier to finish.  I am just amazed at how much paint can change a room!!!


The walls are starting to change!!!  :)

Well, that was how it all started.  This six-week project had only just begun.  I would work during the week and then get two or three days off to work on the bathroom.  It wasn't quick work, but I had one goal in mind...update this room!

I am well on my way.  The bathroom took two days to paint...now it's time to tackle the tiles.

Wednesday, March 7, 2012

Why I Started the Massive Bathroom Project

Well, the home has been good to me for awhile.  But as of late, I've had a bit of a problem.  My bathtub has not always been the best draining tub, but it still got the job done.  I wasn't standing in water at the end of a shower, but it wasn't all gone, either.

Well, I would soon find out why.  My family came over to visit recently, and during that visit, my bathtub decided that it was done draining.  A plumber came in and told me it was due to an old drum trap.  Basically, these old traps would collect dirt and sediment, and, well, over the course of 83 years, I guess too much dirt had accumulated.  He showed me the trap which had a lid for removal, but wouldn't ya know it, the lid was stuck.  He said that wasn't uncommon.

My sister said she would forego a shower for a day.  I can't figure out why?

A large amount of dirt would be pulled back when I plunged.  The water would slowly drain out after that.
Notice the large drum trap in the bottom right.  That lid was sealed shut!!!

But the real kicker is that he gave insight into another interesting feature of my home.  You see, when I step into my tub, I have a nice cushy feeling below my feet.  Being ignorant of tubs, I figured that it was just the tub seal having separated from the tub base.  I was kind of right...and kind of wrong.

While there, he had me step into the tub.  He asked if I heard that.  Nope.  He told me to move around.  Well, wouldn't ya know it, I heard water moving under my feet!  It was squishing at my every move!!!  I have now lived here for five months, and I had never noticed it before!  It's because EVERY time I stepped into the tub the water was already running!  I simply couldn't here the real reason for the cushion below my toes.  It turns out that like so many other homeowners, my previous owners had opted to install a tub liner over their original cast iron tub.

While they look nice, they are quite expensive and can be prone to leaks, I was told.  Basically, if not sealed 100% perfectly, tiny water droplets make it through the caulk.  Over time, these droplets band together and form small puddles.  These small puddles start working away at the tub glue, and in even more time, the glue becomes worthless, and the liner actually separates from the tub.  But the problem is that water has nowhere to go.  It's trapped between the tub liner and the old tub drain which is clamped down tight to prevent seals.  You literally have dirty water that can't go anywhere.  NOT good!

So with that knowledge, I have now begun the process of tackling my 1939 bathroom.  It's going to be a big project, but hey, I'm single and what else am I going to do, right?!

The plumber introduced the idea of refinishing my bathtub.  I had never heard or even considered that before, but the more I look at tub liners vs. the cost of tub refinishing, the more I am falling in love with tub refinishing!  The original tub is basically sanded down and painted like new!  Could it really be that easy?!  The price difference is about $2000 for the liner compared to $300 for the tub.

I think you know which way I am leaning...

Let the massive project begin.

Side Note:  I would later learn that after the plumber installed the new drain AND made a monstrous hole in my kitchen ceiling that that had in fact not fixed the leak.  He then had to snake the sink drain.  And why didn't we try that in the first place, I asked.  Well, he said there was only a 50/50 chance of that working.  I quickly quipped, "If you held a gun to your head that had a 50/50 chance of going off, would you pull the trigger?  50% is HUGE!!!"  He was speechless at my quick response and tried to comfort me in knowing that my old plumbing was now new.  Yeah, sure it was...but it didn't need to be!  Sigh.  A man now trying to justify his mistakes.  That was an expensive $400 project that didn't need to take place...and I now have a hole in my kitchen ceiling!

The new drain with no drum trap.  I am looking down into my kitchen.

The large hole in my kitchen.

The plumber simply wanted to cover up this massive hole with an "easy-access cover."  Um, NO.
What is more, he said that he wanted to just put a cover over it for ease of access in the future.  I asked him if the problem was fixed.  He said absolutely.  I asked him why I needed an easy-access cover then.  If I could get 83 years out of it like the previous one, then I would very much like for my kitchen to have no ugly cover on the ceiling.  He was again taken aback, saying that he would have to bring out his drywall guy, and I think he was shocked to here me say, "That sounds good to  me."  It was like pulling teeth here!!!  He really seemed to be trying to take shortcuts, and I didn't like it.  I mean, he WAS professional, desperately wanted to keep his BBB rating clean, and seemed to know plumbing, but I asked him if he would want a cover in HIS kitchen!  It was a no-brainer.

After much tense verbal sparring (nothing obscene), he agreed to cover the hole (a week later).  I didn't feel like I won at all...I just felt like THAT was the right thing to do.  So after a probably wasted $300, I now have a modern drain that can be snaked in the future...that I probably didn't need.  Oh, the joys of home-ownership sometimes!  Oh well, you live and move on.

The hole has been patched.